Lower Back ache, which i don't have when using my old ride. Was quite disappointed. Funny thing is, only for short hard rides which i really push. Hills don't have, long distances (90km) abit. Find it quite cramp when i go to drop position (not very sure, need to verify).
Incomplete service. Find that i should go for the Powerfoot Cleat Alignment to fully undergo the full standard package from Bike Butler. Even if the benefits doesn't surface much, completing the standard package kinda earn me the right to give comments and review on the service.
Expose to more bike fitting tools. Saw them online and in Butler's place but wasn't included in the part 1 package. Seeing is believing, applying is experiencing. Had did some search online and Youtubed for bike fitting services in U.S site. So much science involved, often think that such services are only for pros. www.smartcycles.com, www.bikefitkit.com
Ok now go into the Powerfoot Cleat Alignment Package
Fore foot measurement. Picture tells a million words, so i think video can save me more time. Youtube, Bike Fit Cleat Wedge
Conclusion: Left leg shorter.. Again sound like some handicap guy.. -_-". Shown to me that the rail of my saddle is tilted to 1 side. Not very obvious but can be seen.
Action: Added 5mm of wedge on the left shoe and 10 deg wedge on both shoes. And some adjustment to the cleat position. Ever adjustment is done after a few mins of ride with the heaviest gear ratio.

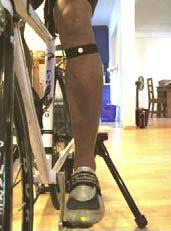
Vertical Stroke Adjustment. Visualize a line cutting across the dot on the knee and shoe. We should be pedaling with the dot on knee in line with the dot on shoe.
This is also not me.
Personally i find that this got to do with the riders riding proficiency. I have problem coordinating my left leg, as i focus too much pedaling by my right. So i have to constantly remind myself to coordinate with my left leg. Need to do more single leg drill.
Rotational Adjustment of Cleat. With the use of RAD aka chopstick
Rotational Adjustment of Cleat. With the use of RAD aka chopstick

RAD is a dummy jig for clipless pedal, however with more float exist. White Stick attached to the cleat while Red Stick to the Pedal. So when pedal, we can see clearly how much ankle movement is there during pedaling.
Pedaling Technique Correction
This is done concurrent with cleat alignment and vertical stroke alignment.
Ok all set! Finalised by marking the position of cleats with marker. Now is to keep riding and feel for discomfort. For more review of this package.
Review / Comments
Only rode for short distances. However now paying more emphasis on my left leg. Need to play more attention to body discomfort even for the slightest. E.g. Numbness on hand and toe, which leg first? Lower lumbar ache, which side. Any pain on knees, etc..
For anyone keen in this service, ask yourself the above mention questions before you visit Bike Butler. Also these following 2 questions
If pricing is an issue, ask yourself whether the current bike position is affecting you or bring you any discomfort. If not then stick with your old ride.
If 'looking garang' on a bike is important, ask yourself whether you are willing to change to a more upright position with handlebar brought more closely to you.
Rider should go for Bike fit follow by the Powerfoot cleat alignment. Get a fitting bike before going into pedaling efficiency.
Some websites for reference:
http://www.thebikebutler.com/
http://www.bikefit.com/
http://bikefitkit.com/
http://www.smartcycles.com/
Video Clip of bike fitting in US.
Clip 1
Clip 2
No comments:
Post a Comment