Showing posts with label Bike Fitting. Show all posts

Saturday, May 29, 2010

Bike Fitting using Motion Analysis

Just did some DIY bike fitting at home over the weekend, after viewing almost all the bike fitting clips in YouTube. Saw one of the clips in YouTube, stating how they used motion analysis to do bike fitting/analysis. Just nice, Grace who has trainer, is going to Port Dickson over the weekend for race. So borrowed the trainer, hook up my camera and ACTION!

Riding on a new bike again, confused with the bike fitting theories recommended by different people. So decided to film myself to see how i look like while riding instead of hearing people's comments. Perspective can be different from view's of different people, which leads to the wrong buy of my titanium frame.

Currently judging by personal comfort, going for longer rides to see which area needs to improve. But worried that my current 'comfort' position might be straining my knees, or not optimizing my effort when riding.

Google online, looking for 'ideal' leg bend angles, poseur etc... Trying to find the commonly used figures.


Upper body Poseur

Looks pretty decent to me, not to upright nor to forward.. Looks like I'm tipping toes when pedal is at 6 o'clock (had lowered seat by 5mm)


Leg Bend Angle

As said earlier, googled on leg angle. Mostly recommend 30-35 deg. I don't know how they get that figure. What i assumed is the difference in angle when knee is bent from a straight poseur.
The above picture is not very accurate, forget to paste a sticker over my pelvis bone. So have to estimate the point.
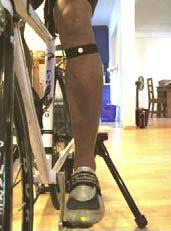

Knee Over Pedal

This is to check the fore/aft of the saddle. Looks fine to me. Except on a few occasions, my knees will move forwards by 1-2cm. On a clip showing bike fit for tri bikes, they figured this guy with 3-4cm knee in front of the pedal spindle. So i think its fine, anyway i don't always move forward.

Overall was glad that i can see how i ride and some figures regarding my current position. Problem with using motion analysis is the camera angle and position of it from the user. The areas away from the camera focus point tend to convex out. Still cant beat bike fitting with the help of a friend doing the measuring while you cycle.

Sorry, didnt wanna go throught the features of the software im using. Pretty tired of drafting this post already. The only main features is, it can slowdown and pause split-seconds of your action and take measurements.


Bike Fit Anatomy
C Cube

Wednesday, September 03, 2008

Bike Fitting 101: Part 2

Ok! after getting the bike for more than 1 month, ride with group for over 90km, climbed a few hills. These are my few observation.

Lower Back ache, which i don't have when using my old ride. Was quite disappointed. Funny thing is, only for short hard rides which i really push. Hills don't have, long distances (90km) abit. Find it quite cramp when i go to drop position (not very sure, need to verify).

Incomplete service. Find that i should go for the Powerfoot Cleat Alignment to fully undergo the full standard package from Bike Butler. Even if the benefits doesn't surface much, completing the standard package kinda earn me the right to give comments and review on the service.

Expose to more bike fitting tools. Saw them online and in Butler's place but wasn't included in the part 1 package. Seeing is believing, applying is experiencing. Had did some search online and Youtubed for bike fitting services in U.S site. So much science involved, often think that such services are only for pros. www.smartcycles.com, www.bikefitkit.com

Ok now go into the Powerfoot Cleat Alignment Package

Fore foot measurement. Picture tells a million words, so i think video can save me more time. Youtube, Bike Fit Cleat Wedge

Conclusion: Left leg shorter.. Again sound like some handicap guy.. -_-". Shown to me that the rail of my saddle is tilted to 1 side. Not very obvious but can be seen.

Action: Added 5mm of wedge on the left shoe and 10 deg wedge on both shoes. And some adjustment to the cleat position. Ever adjustment is done after a few mins of ride with the heaviest gear ratio.


This is not my pedal

Vertical Stroke Adjustment. Visualize a line cutting across the dot on the knee and shoe. We should be pedaling with the dot on knee in line with the dot on shoe.


This is also not me.

Personally i find that this got to do with the riders riding proficiency. I have problem coordinating my left leg, as i focus too much pedaling by my right. So i have to constantly remind myself to coordinate with my left leg. Need to do more single leg drill.

Rotational Adjustment of Cleat. With the use of RAD aka chopstick


This is not my shoe

RAD is a dummy jig for clipless pedal, however with more float exist. White Stick attached to the cleat while Red Stick to the Pedal. So when pedal, we can see clearly how much ankle movement is there during pedaling.

Pedaling Technique Correction
This is done concurrent with cleat alignment and vertical stroke alignment.

Ok all set! Finalised by marking the position of cleats with marker. Now is to keep riding and feel for discomfort. For more review of this package.

Review / Comments
Only rode for short distances. However now paying more emphasis on my left leg. Need to play more attention to body discomfort even for the slightest. E.g. Numbness on hand and toe, which leg first? Lower lumbar ache, which side. Any pain on knees, etc..

For anyone keen in this service, ask yourself the above mention questions before you visit Bike Butler. Also these following 2 questions

If pricing is an issue, ask yourself whether the current bike position is affecting you or bring you any discomfort. If not then stick with your old ride.
If 'looking garang' on a bike is important, ask yourself whether you are willing to change to a more upright position with handlebar brought more closely to you.

Rider should go for Bike fit follow by the Powerfoot cleat alignment. Get a fitting bike before going into pedaling efficiency.

Some websites for reference:
http://www.thebikebutler.com/
http://www.bikefit.com/
http://bikefitkit.com/
http://www.smartcycles.com/

Video Clip of bike fitting in US.
Clip 1
Clip 2

Bike Fitting 101: Part 1

Finally finish all the bike fitting services provided by the Bike Butler. Quite an experience and educational. It allow me to pay more emphasis on my bike riding.

Why i go for it?
2 year ago, before i entered Army, was recommend to visit Bike Butler for Bike Fitting Service. Price then to me is pretty steep (even now). 100+ for Bike Fit and Positioning and another 100+ for Powerfoot Cleat Alignment. Hence, didn't go for it as I'm fine with my old bike position.

2 years later, with more positive reviews from Coach and illusion of me being more wealthy with the army allowance. I went for the bike fitting. Was so decided to get a new bike that i sold off my old ride and hoping to get one from the Bike Butler.

Bike Fit Positioning
First thing Butler did was throw me on his 'Measuring Station'. Figures shows that i had short arm short leg. -_-" sound like turtle...

Next I'm introduced to this 'AFS Bike Tool' a dummy bike jig used to assess my riding posture and my custom frame measurement.

After some body alignment... Wala! My new custom made titanium frame!


Some measurement of the frame:
Top Tube: 51cm (actual), 53cm (virtual)
Seat Tube: 44cm (CTC), 48cm (CTT)
Seat Tube Angle: 72 deg
Head Tube: 16cm
A pretty sit-back and up-right position with the 72 deg seat tube angle and long head tube.

Bike is then setup with the parts which i like, also tried to copy the theme of CUBE HPT but didn't turn out well.. Making of the CUBE

After service review & thoughts
Bike Butler have this signature mark on most of his bike. Yes~ the super long Head Tube which had invited many comments about it. Should really see my Coach ride... With the more upright position, i constantly remind myself to apply lesser pressure on my palm and work my core harder to maintain the nice curve of my back.

Leveling the handlebar and saddle height, makes the rider looks less 'garang'. But allowing the rider to sit in the 'neutral/optimal' position. Personally I'm still trying to find out more on this 'neutral/optimal' position specially on how arch should our lower back be? Tried googling it but not much findings.

Compared the Bike Butler's fitting with the US Fitting Service. Of course with more resources and support, US looks much better. They can provide video clips of you riding before and after the service. Can try go 'YouTube, Bike Fitting' as Bike shops actually uses YouTube as a media to market their bike fitting service.

Lastly Bike Fitting Service is like consulting a doctor. They can diagnose through a few tests to tell where is the problem. But without proper input from the patients, they still cant make proper judgement and prescription. E.g. Pain.. How pain? Discomfort, How discomfort is discomfort? Same for ache, sore, numb.. Especially for beginners.. isn't pressure on hand and buttock common? Will a series of tests and questionnaire help?